Why You’ll Love this Salt-Crusted Tri-Tip Roast
If you’re looking for a show-stopping yet surprisingly simple centerpiece for your next dinner party, this salt-crusted tri-tip roast will absolutely deliver.
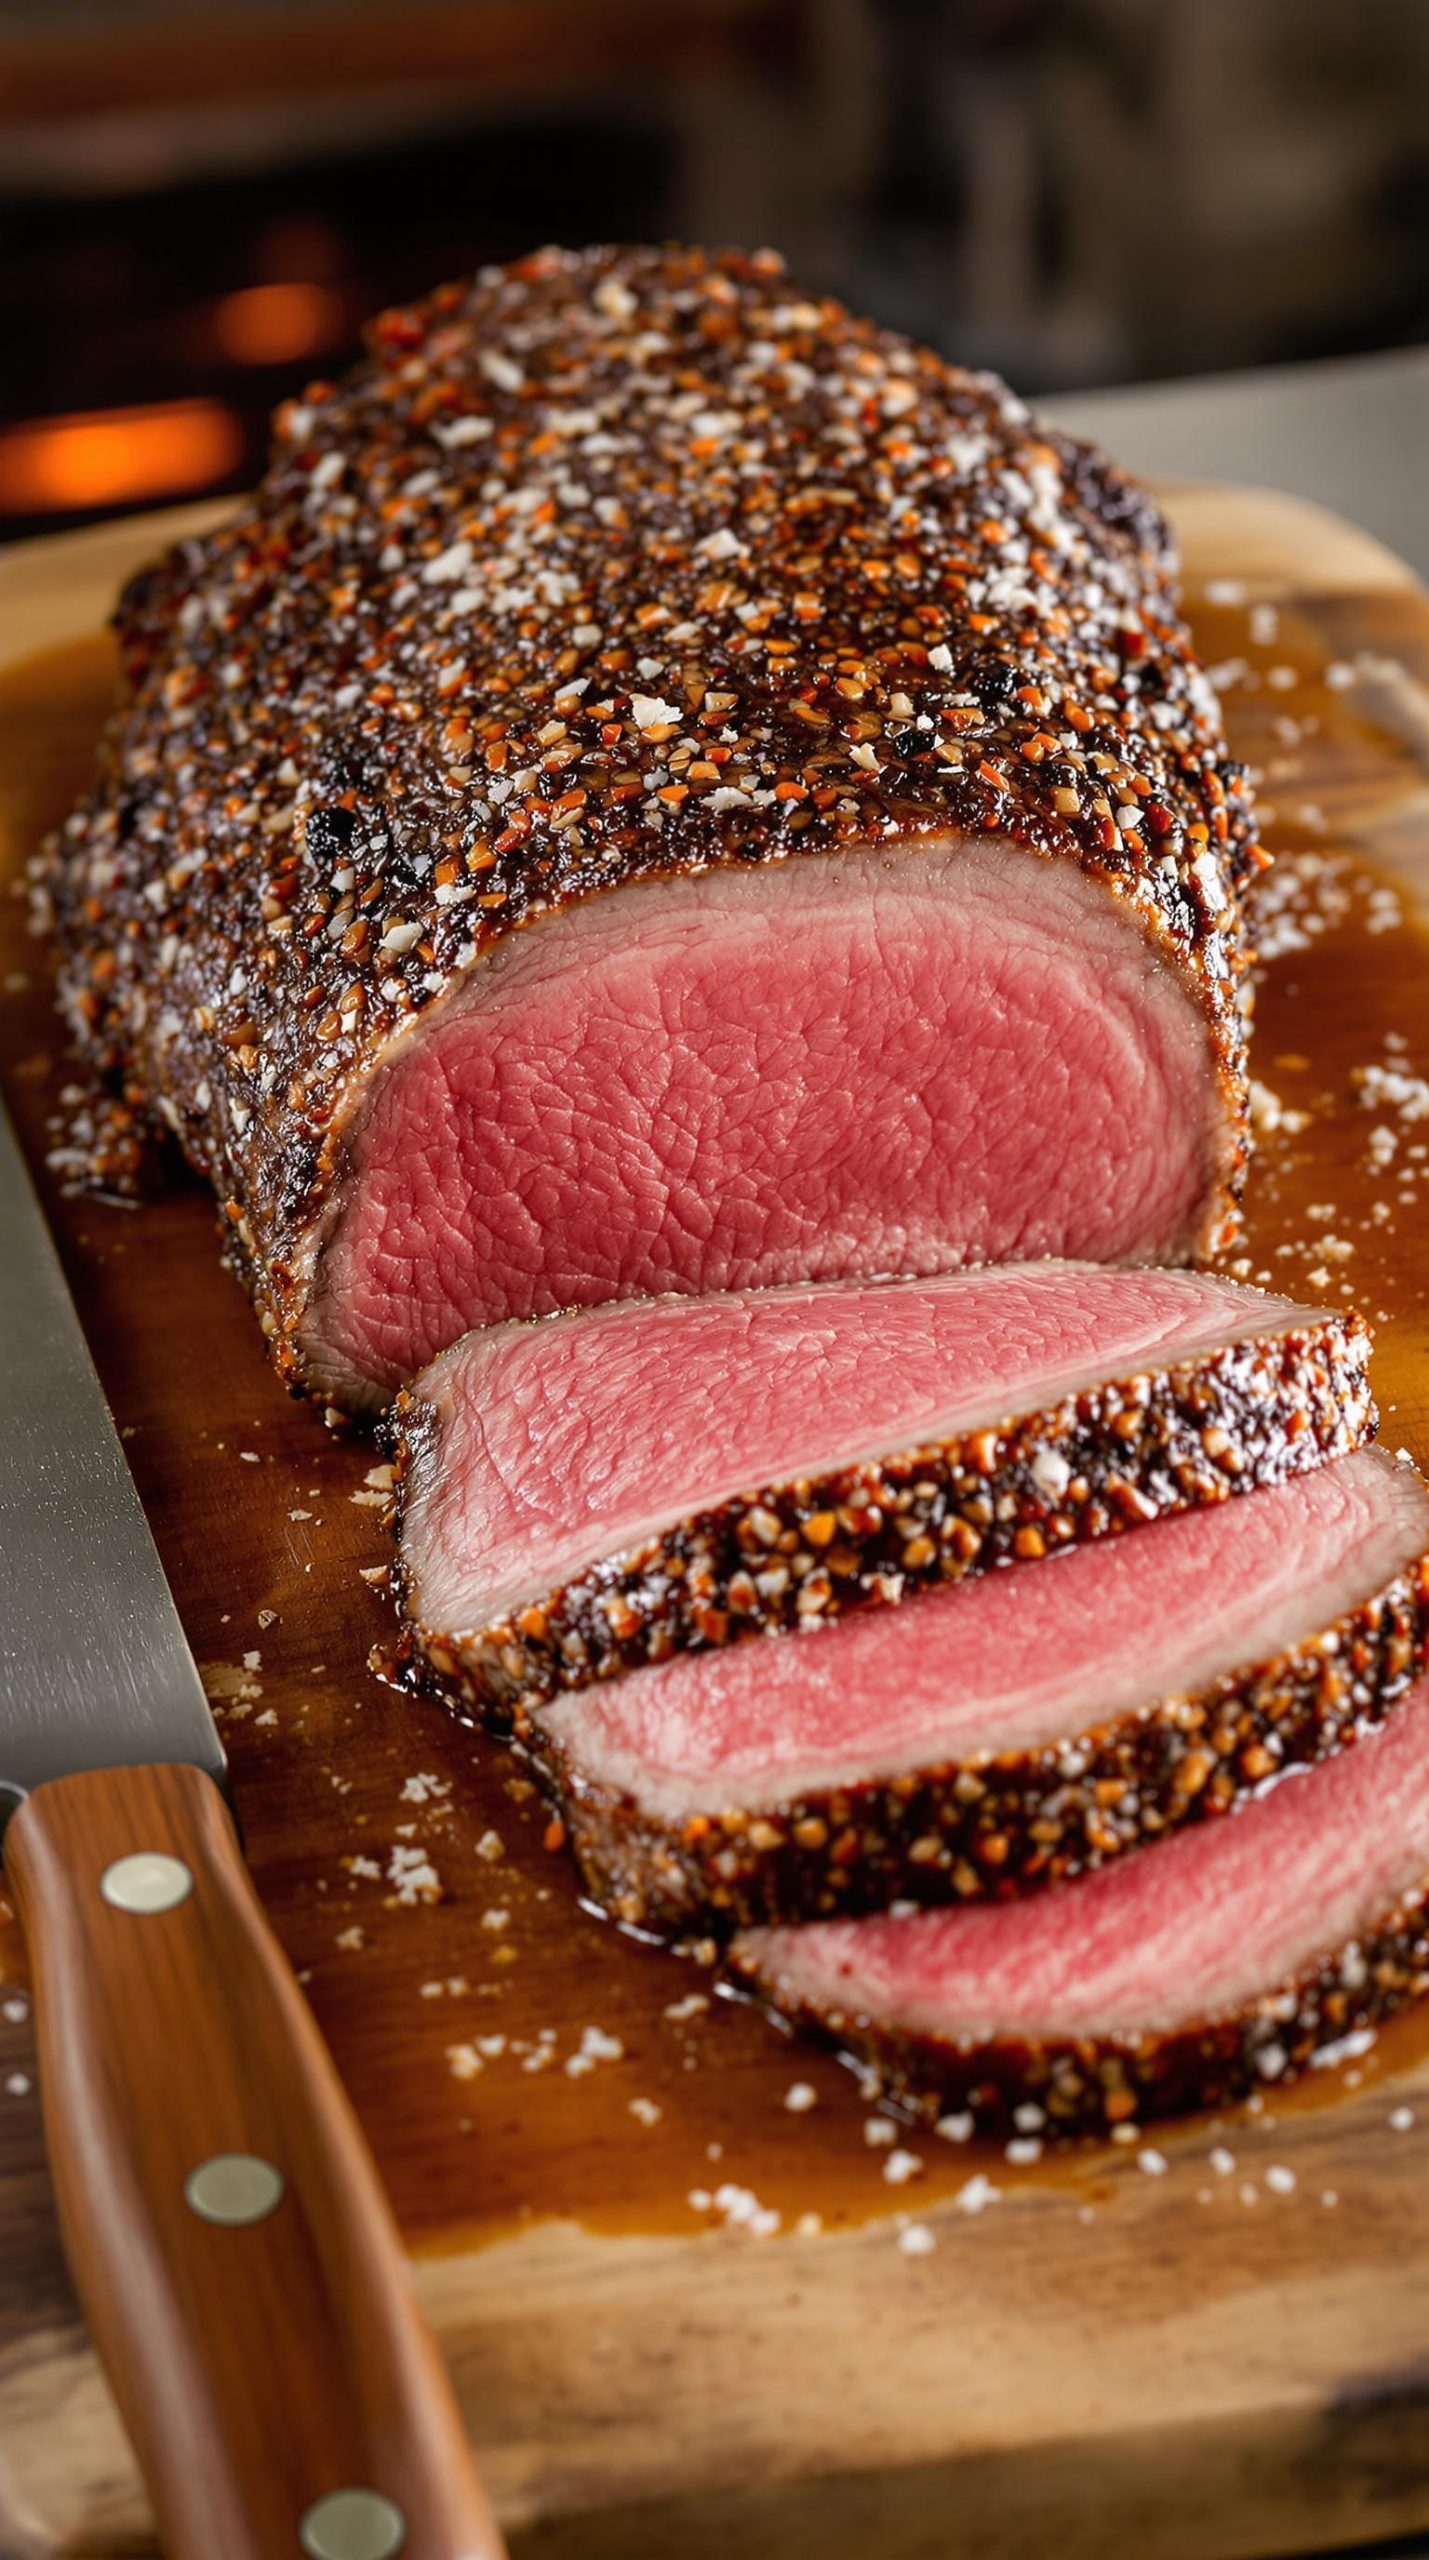
The seasoned salt creates a magical seal around the meat, locking in juices while infusing flavor throughout.
What’s not to love about a technique that transforms an ordinary cut into something extraordinary?
The roast literally changes shape as it cooks, expanding like a pillow within its salty cocoon.
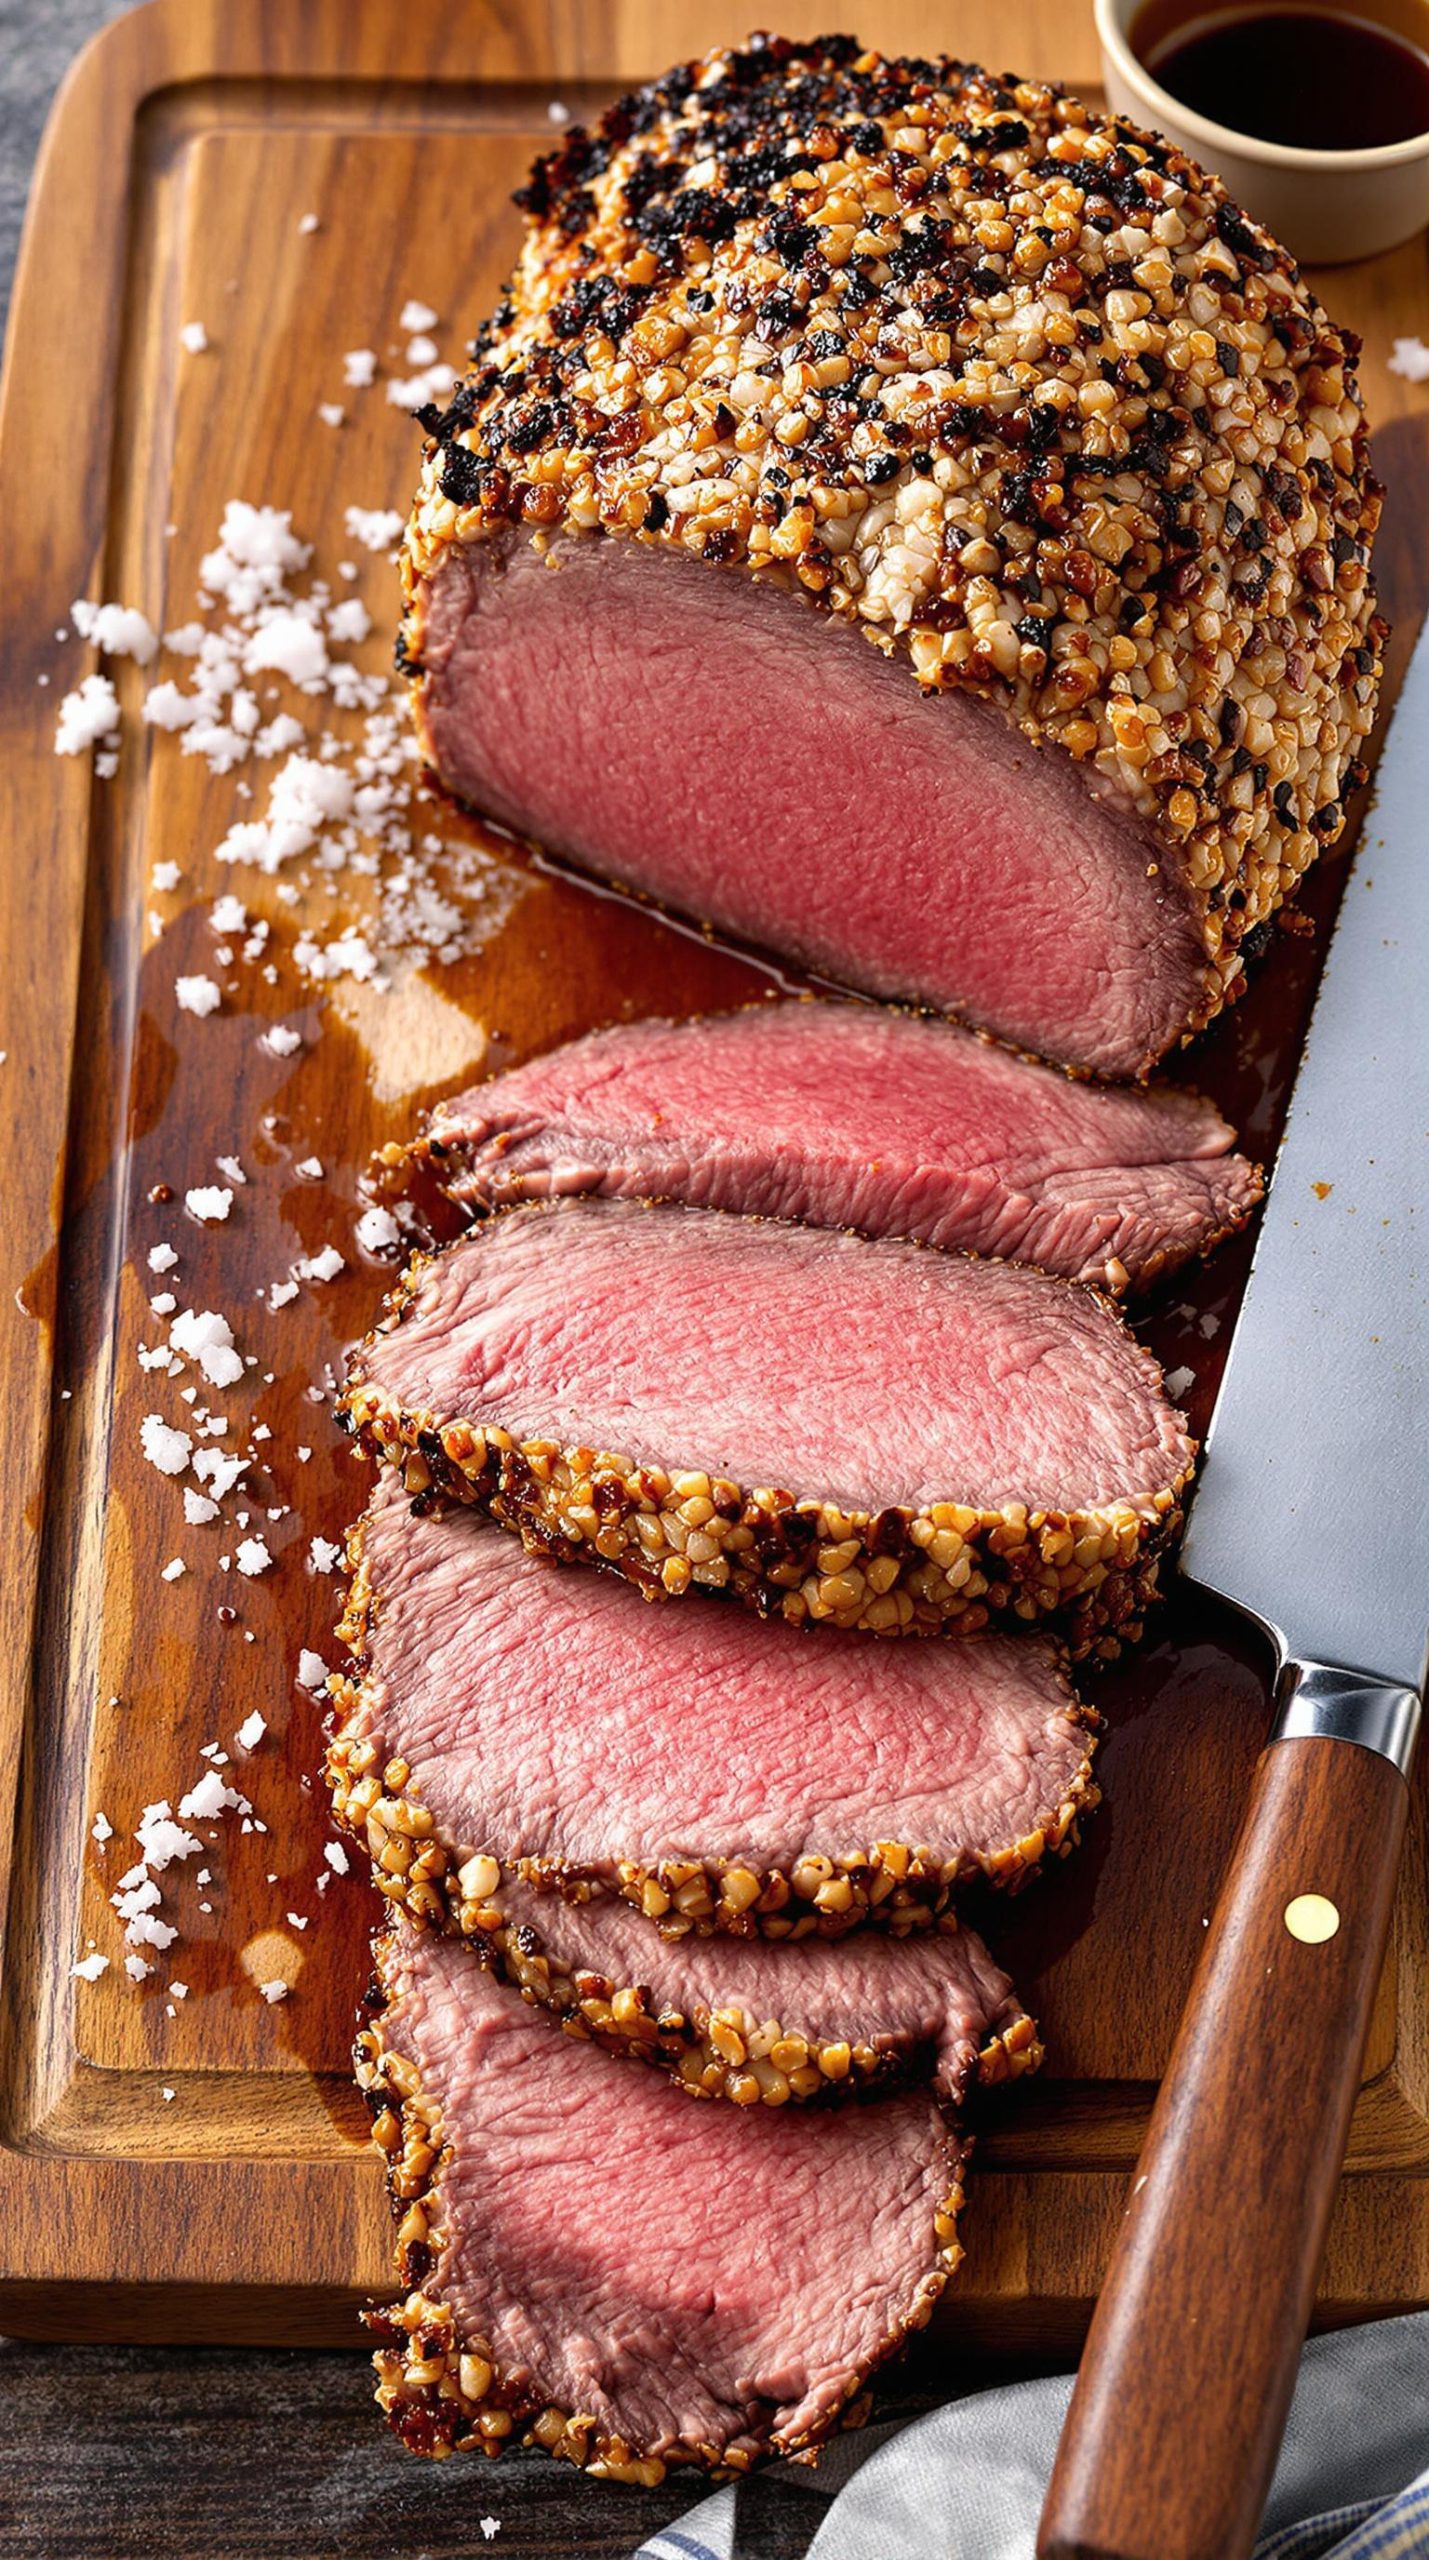
And those edges? They develop these gorgeous caramelized bits that might be my favorite part. Perfect for slicing thin and serving on small sandwiches or rye bread.
What Ingredients are in Salt-Crusted Tri-Tip Roast?
The beauty of salt-crusted tri-tip roast lies in its simplicity. This impressive dish relies on just two main ingredients to create a flavorful, juicy result that will have your dinner guests thinking you spent hours in the kitchen.
The seasoned salt creates a magical seal around the meat, trapping moisture inside while infusing it with flavor. It’s one of those cooking techniques that feels almost transformative—turning an ordinary cut of beef into something extraordinary with minimal effort.
- 2 lbs tri-tip roast
- 4 tablespoons seasoned salt (specifically Lawry’s is recommended)
When selecting your tri-tip roast, don’t be put off by its somewhat unattractive appearance straight from the package. This diamond in the rough transforms beautifully during cooking.
While the recipe calls for Lawry’s seasoned salt specifically, you could experiment with other seasoned salt blends if you prefer, though the classic flavor profile works perfectly here.
Just remember the critical timing element—3 to 4 hours of resting with the salt rub is ideal, but don’t exceed this by letting it sit overnight, as this could make the meat too salty and affect its texture.
And make sure to let the meat come to room temperature before grilling by removing it from the refrigerator about an hour beforehand.
How to Make this Salt-Crusted Tri-Tip Roast
The magic begins with a generous coating of seasoned salt. Take your 2 lbs tri-tip roast and thoroughly coat the entire surface with 4 tablespoons of Lawry’s seasoned salt, making sure to create a complete seal around the meat. This salt layer isn’t just for flavor—it’s creating a moisture-trapping barrier that will transform your roast into something spectacular. Consider investing in premium pickling sets to expand your preservation skills beyond this salt-crusting technique. Once coated, place the roast in the refrigerator for 3-4 hours, but be careful not to leave it overnight as over-salting can ruin the delicate balance we’re aiming for. About an hour before cooking, take the meat out of the fridge to let it come to room temperature.
Now for the grilling setup, which is essential to get right. Prepare your charcoal grill for indirect cooking using trays or rails, and this is important—use a grilling rack to prevent grill marks from scoring the roast. If you don’t have a rack and need to place the meat directly on the grill, be sure to position a drip pan underneath, as the roast will release quite a bit of liquid during cooking.
Keep the grill covered and maintain a temperature between 375-425°F, especially during that first half hour. Grill the covered roast for about 20 minutes, then turn it once, checking the internal temperature after about 40 minutes total. A premium stand mixer can help you prepare complementary side dishes while your roast cooks to perfection.
You’ll know you’ve achieved the perfect salt seal when the roast actually changes shape, sometimes expanding like a pillow within its salty casing. Remove the roast when it reaches an internal temperature of 135°F for a perfect medium-rare.
Let it rest for 10 minutes before slicing—this resting period is non-negotiable if you want juicy meat! Be prepared for a substantial amount of flavorful juices to escape (easily a half cup or more), so use a deeply grooved cutting board for slicing.
Here’s where tri-tip gets tricky: the grain changes direction throughout the roast, so pay close attention as you slice. Always cut against the grain, keeping slices thin and small—perfect for sandwiches or serving on rye bread slices at your next gathering.
Salt-Crusted Tri-Tip Roast Substitutions and Variations
While mastering the basic salt-crusted tri-tip recipe gives you a solid foundation, exploring variations can take your flavor game to new heights.
Instead of Lawry’s seasoning salt, you might try smoked paprika mixed with kosher salt for a Spanish flair. Or perhaps go with a coffee-salt rub that creates an incredible crust—trust me, it’s not as weird as it sounds.
For cooking methods, you can swap the charcoal grill for a smoker using hickory or oak.
Don’t have outdoor space? An oven-roasted tri-tip at 375°F works beautifully too, though you’ll miss that smoky kiss.
What to Serve with Salt-Crusted Tri-Tip Roast
So what should you pair with your perfectly salt-crusted tri-tip roast? I love serving mine with simple, hearty sides that complement the robust beef flavor without competing for attention.
Consider small rye bread slices for those delicious thin-cut sandwiches mentioned in the recipe. A deeply grooved cutting board isn’t just for carving—it’s perfect for presenting the juicy slices alongside horseradish sauce or chimichurri.
For sides, think classic: roasted potatoes, a bright vinegar-based coleslaw, or grilled vegetables.
The beautiful thing about tri-tip? It’s casual enough for paper plates, fancy enough for your good china. Your call.
Final Thoughts
After mastering this salt-crusted tri-tip technique, you’ll never look at this humble cut the same way again.
The transformation is almost magical—watching that salt seal expand like a pillow as it cooks, locking in all those savory juices.
Remember, patience is key with the rub (but not too much patience—no overnight salting, please).
And don’t forget about those changing grain directions when slicing. A sharp knife and attention to detail will reward you with tender, flavorful bites every time.
I’m convinced this method delivers restaurant-quality results without fancy equipment.
Just you, your grill, and a little salt magic.